Friday, December 27, 2013

Bobble Edge Tutorial

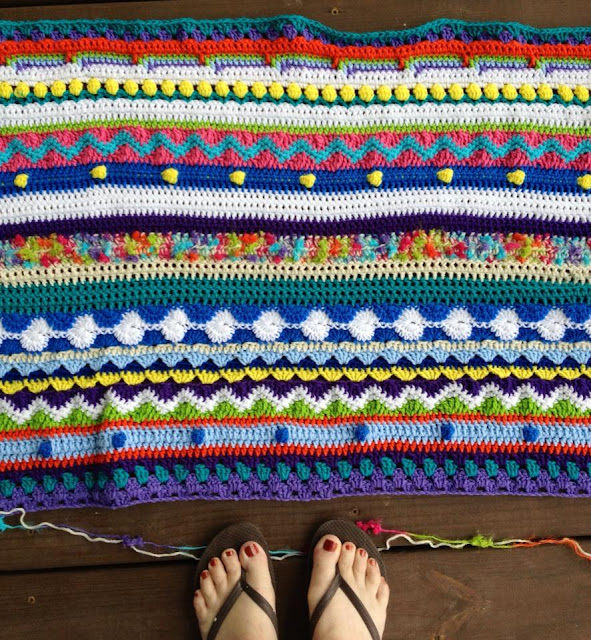
This make the cutest edging ever!  After completing a round of half double crochet for a base, I added the bobble edge.  If you are changing colors, slip stitch the new yarn in place.  The bobble is basically made by crocheting two clusters of DCs together into a little ball.  Each cluster makes half the bobble. Chains create the V shape.

Chain 5, then chain 3.  The 3 create the first DC in your cluster.
Cluster - chain 3 (already done) plus 3 DC together. This is basically doing the first part of a DC, and not finishing it, but going on and making all the first halves, until all your DCs are on the hook, waiting for the final half of the DC, which pulls them together into one cluster stitch.  (I hope that made sense!)

Anyway, here are instructions for the  DC together:  yarn over (yo), insert the hook back into the chain, yo, draw the yarn through the stitch, yo, draw the yarn through 2 loops on the hook.

Repeat the DC together stitch until you have 4 loops on your hook. Yo, pull through all the loops. Cluster completed!

Repeat the cluster - 3 DC, 3 DC together.  Now you have two clusters next to each other. Slip stitch into the top of the first cluster, pulling the two halves into a little ball.

Chain 5. Slip stitch into your project.  I like to make mine 4 stitches apart.

Repeat from the beginning - chain 5, chain 3, cluster, chain 3, cluster, slip stitch the clusters together, chain 5 slip stitch to the project.

I find this time consuming - but very gratifying! Hope the directions made sense to you, and you give it a try!


Ponchos are Cool!

I've been thinking about making ponchos for little girls for ages.  My Pinterest boards prove it - lots of pictures of cute little ponchos pinned - waiting and providing inspiration.  Took me a while to decide whether I'd go the stripe route, or with squares. I chose to make it from squares - but then how many?  Since I just finished the big blanket of little squares, I was ready to make a few large ones and be done.  These ponchos are made with just 4 squares each, plus borders.  I intentionally made each square different.  Pictures show both sides.  

About the edging...  when looking for inspiration, I saw a lot of fringe.  Fringe is good - but not the way I wanted to go.  I had visions of girls playing with it and accidentally pulling it apart.  Bobble edging seemed like the answer - and I LOVE the results!  

These are going to twin 5 year old girls.  I wanted similar but different.  One loves pink, the other loves purple, so there you go! 


Each square has 11 rounds of color... then one round of white.  I used a modified Join As You Go method to connect them.  Instead of connecting in each of the DC stitches, I simply used a slip stitch between each of the granny clusters.   I love the clean edge this gives.  

The neckline has one round of half double crochets to finish it off.  The bottom edge includes: one round of granny clusters in white, a round in the color, a round of half double crochet in color, and then the bobble stitch.  I will be posting instructions and pictures of the bobble edging soon.  It's definitely become one of my favorite ways to finish off a project and was quite simple.  Just chains and dc clusters. 


Saturday, December 21, 2013

Ta-Dah!


And it's finished!  I'm absolutely in love with the final results!  


Monday, December 16, 2013

Little Squares = a Big Blanket!

I'm surprised by the size of this blanket! I thought using up bits of yarn, it would end up being smaller, more like a throw instead of a full-fledged blanket.  Now, I don't think I'm capable of making them small!

Final count = 396 small squares - and more than 34 different shades of Stylecraft DK yarn.  Squares are arranged 18X22, with "planned" randomness.  I tried to make sure squares with the same outer color are not next to each other, and that the color distribution is balanced.  Otherwise, they aren't in any order. 

I decided the blanket needed a substantial border, with a little color to pull in the squares, and a really fun edge.  How about this? The bobbles are slow and time consuming - but I think they are totally worth it! Makes me happy to look at it!  I hope to finish this up and post final pictures in a few days.  

A few pattern notes:  this is a modified granny square using sets of 4 double crochet instead of 3. Corners have 2 chains. 

Bobble edge: chain 8, dc 3 together in the 5th chain, chain 4 dc 3 together in the 1st chain. This gives 2 halves of the bobble, which have to be connected with a slip stitch (or 2) by going back into the chain where you did the first dc3 together.  Chain 5, sc into your project to connect it.  Keep repeating.  I'll try to get pictures as I continue working and post them later.  Really simply - and super cute!


Wednesday, October 23, 2013

Love Squared and Progress on Random Projects

Time to update some of the projects I've been working on.  First - my friend Leah issued a 1,000 square summer challenge for Love-Squared.  It didn't take long to realize that we would smash that challenge, and in fact, we collected more than 2,000 squares by the end of September.  It was amazing!

Here are some of my contributions and some long awaited Ta-Dahs!

Lots of Hello Kitty squares - FINALLY completed!  
Miscellaneous granny squares, using up odds and ends of leftover yarn. 

And monster faces!  I think they ended up looking a little bit like Muppets. 


I finally finished my granny patch blanket... modeled by my sweet Gertie-bird!

Remember these?


My box slowly grew, until I had 396 little squares!  Now, it looks like this:


And I've connected less than half the squares!

Saturday, June 15, 2013

Ch Ch Ch Changes.....

Holy Cow! Have I been busy!

Started a new job in June - which is incredible, amazing, emotional, overwhelming, and more.  I'm the new Executive Director of Good Grief of Northwest Ohio, providing peer support programs for grieving children. The organization is brand new, so lots and lots to do.  In the beginning, this had my emotions stirring, as I was the kid who needed this program when none existed. 

From age 14 - 20, my Dad was battling cancer. He died at 51. Way too young. Along with my 5 siblings (we ranged from 5 - 19 when the cancer was diagnosed) I spent 6 tumultuous years preparing for his death. Nightmarish is putting it nicely.  It's been 28 years, and I worked through the sadness and grief long ago, but I'm still in awe thinking about what we managed it.  It's a bit like a Lifetime Movie! (Come to think of it, maybe I should sell the rights? lol)  Anyway, when I heard about Good Grief, I knew I had to learn more.  

At the same time I started the new job, I was shopping and packing up my girls to ship them down to Manchester, Tennessee for Bonnaroo.  I researched blogs for packing lists and survival tips to ensure they would have everything they needed.  I kissed them goodbye Tuesday, and sent them to Grandma's in Cincinnati for a night (to break up the drive). They left Grandma's Wednesday and made their way to Tennessee.  I talked with them briefly that evening, while they sat in a ridiculously long car line, waiting to get to their "campsite."  At 1:00 a.m. Toledo time, they called to say they finally finished setting up the tent. Crazy! 

We only talked a few times during the trip - which is great. They were busy seeing amazing bands, and hanging out with friends. Thing Two literally cried seeing Paul McCartney in concert.  They were in heaven.  And I earned the title: BEST MOM EVER! 

One other exciting tidbit from summer - I had THREE broody hens all at once. Seriously! Lucy, Maggie, and Abbey, (why yes - those all are names from Beatles songs) were pining away for babies.  I sent Abbey to a friend's house to hatch a batch of special, Black Copper Marans eggs. We were hoping she would adjust, and decide to do the work, but no such luck. Of course, we kidnapped her and moved her to a new box, so what did we expect?  

After three weeks, Lucy finally gave up, leaving just Maggie, hanging out in the box, trying to hatch eggs that will never hatch. Cranky, hormonal hens are a force to be reckoned with!  

And that was summer! 

Sunday, May 19, 2013

Gardening, Movies, Doctor Who.... Spring!

Here's a little bit of what I've been "up to" lately.... not included in these pics, my two new blackberry bushes, a gorgeous white spirea, and loads of annuals for the boxes on my deck rail.  I love spring, but it certainly is a lot of work!

I took gardening and work breaks to see the new Great Gatsby movie (absolutely horrible - still trying to erase it from my mind) and the new Star Trek movie (AMAZING - can't wait to see it again!)

Are you a Doctor Who fan?  HOLY COW! Saw the season finale last night, and am still speculating about what it all means.  Do I really have to wait until fall for more?

Anyway, back to the garden... This is the gorgeous azalea in front of my house. It's huge and covered with purple blooms. LOVE it!

Got two of these big red double knock-out roses from Costco for jut $13.99. They will fill out and be covered with gorgeous red blossoms all summer.

New, soft pink azalea in the backyard....

This azalea is white, and also in the backyard...

Lucy - broody and evicted from the nesting box.


Friday, April 26, 2013

Poor, Neglected Kitty

I haven't worked on these squares lately, but need to get back to them soon! There are still eighteen Hello Kitty squares here. Fourteen need faces, and then they will be done.  Total squares on the table - thirty!


On another note, check out my tutorial for JAYG - or joining squares as you go. I'm not using it on the kitties, as they are going to be donated to Love-Squared, mixed in with other squares, to make awesome blankets for homeless children here in Toledo.  

I did use JAYG on the granny patches blanket, which is now getting a border! FINALLY! I'll post a "ta-da" photo when it's done.  In the meantime, here's a picture of the work in progress...


See that nice, flat join? Yup, that's what you get with JAYG. It's also great for self-blocking, as it pulls the squares into shape.  If you haven't tried it - it's time to give it a go.  You won't be sorry!

Wednesday, April 17, 2013

Bombs Away!

This is very exciting to me....

Lucas County Children's Services, our local agency responsible for protecting children from abuse and neglect, teamed up with local street artists - particularly an anonymous lady known as Streetspun Yarnbombing - to wrap our city in blue yarn to bring awareness to Child Abuse Prevention.  Streetspun spread the word via Facebook and other media, to get hooks and needles going.

People (like me) went crazy!  This was my first ever yarnbomb. What's particularly fun, is that "we" (I include myself as a citizen of Toledo) received gifts of blue yarnbombs from around the world.  Here are a few pictures of the bombing installation....


Why yes....that is my contribution of hearts on the upper half of the tree on the right! I feel like a celebrity, even though nobody knows I did it.


Now that I've had a taste of street art, I may never be the same.  I've already completed my next yarnbomb!


Yes.... I did take a bit of inspiration from the Mixed Stripe Blanket.  This picture isn't doing the colors justice.  It's really quite bright and cheery.

Here it is, wrapped around a tree. (Pay no attention to that little chicken in the background!)


But you know, that wasn't enough.  I've been dying for an excuse to try the Happy Flower Decoration from Attic24.  What better reason than decorations for a city that needs love and happy things so desperately?   This picture is a little fuzzy (but so is the yarn....lol).  Actually, we had a bit of wind that kept spinning the flower. It was hard to get a picture!


In a few months, when everything is green and gorgeous, these little creations of mine will be on display, along with the work of many other fiber artists.  I'm thrilled to have a small part in these projects.

Before I forget... the yarn is just worsted weight, some leftovers I had in a bin, waiting for a project.  I think they've been put to good use!

Tuesday, April 2, 2013

Bunny-licious

I couldn't help myself...this one stays with us.  He's made of Stylecraft DK yarn scraps and a 3.75 hook.


Sunday, March 31, 2013

Happy Easter


Five minutes later...


Hippity Hoppity

I caved in and did what everybody in crochetland seems to be doing these days - I made the now famous Bunnies from Green Dragonfly. Go. Make these right now. They are easy and so adorable.

Note - we used leftover worsted weight yarn and an I or 5.5 mm hook.


Thing One (my 21 year old daughter) made the white bunny. I made the gray one.  This morning, they are being cuddled by an 8 year old.


Sunday, March 24, 2013

Weekend Pics...

Snow is in our forecast and the wind is howling. Sounds like a crochet and soup weekend.


Wednesday, March 20, 2013

Granny Patch

Making progress!

Simple, four round, granny squares, using a "join as you go" method. The yarn is Stylecraft Special DK, and there are about 30 different colors here. I have to admit, this hasn't been one of my favorite projects, but it is growing on me as it gets bigger.  This picture shows 9 rows of 10 squares. I added another row last night. I think 20 rows of 10 - 200 squares total - plus a border should do it.

Sunday, March 17, 2013

Cranberry Almond Lemon Bread


I love bread. I do. Can't imagine life without it. And I'm a big fan of no-knead artisan bread recipes. In fact, I don't think I'll ever knead dough again. What's the point? I've had more success with the no-knead varieties than I ever had with traditional bread baking. It's easy. It's successful. I'm basically lazy, so this is a win.

Recipes and instructions for no knead breads are available all over the internet, and there are many books out there, too.  The one I am most familiar with is Artisan Bread in Five Minutes a Day.  Easy. For the most part, I follow the basic recipe from Artisan bread in five. I do make a few small, but notable, changes.

Lots of things could affect it, but I get a better rise and airier bread if I increase the yeast a little bit, and add some sugar or honey to the dough. The sugar feeds the yeast, making it rise more.  It's important to follow the recipes the way they are written first - then play with them and see what works best for you. 

Well, this weekend, I was reading through my blog list. I subscribe to a lot of blogs - almost all are connected to food or crochet.  I get lots of inspiration from what others are doing, and this weekend, bread was on the list. Simply So Good is featuring a Cranberry, Almond, Orange, Artisan no-knead bread! It looks fabulous. I MUST try it.  And the dough is rising right now.  I have one minor change - no oranges in the house, but plenty of lemon, thus my version is Cranberry - Almond - Lemon Bread. I am a firm believer in substituting citrus at will, and a little thing like lack of oranges will not keep me from my bread!

Here's what I did:

Combined gently in my Kitchenaid standing mixer:
1 1/2 cups warm water
1 TBSP yeast
about 2 TBSP honey (squirted in, not measured)
1 TBSP kosher salt
Two big handfuls of dried cranberry
about a cup toasted, slivered almonds
grated peel of one lemon
3 cups all-purpose, unbleached flour

Yes, the dough is super sticky. If you compare my ingredients to Simply So Good, you can see they are almost the same.  I did follow her suggestion and toast the almonds. And knowing what I know about MY success with artisan breads, I increased the yeast a little bit and added that squirt of honey.  

I covered the bowl and left it on the counter for two hours. When I returned, it had more than doubled in size. At this point, I generously floured my parchment paper, and dumped the bread dough into a heap. With floured hands, I shaped it into a loaf, covered it with a linen cloth, and walked away. 

Here is the wet sticky dough after the first rising...


And here it is floured, on the parchment paper, ready for more rising.


And here is a favorite tip I picked up from Pinterest!  See that lid?  That's from a Parmesan cheese container. It fits on a standard canning jar. I keep flour in this one, but I have several jars just like it with other things. It is super handy! I don't have to grab my big flour bin from the cabinet when I just need a little bit to thicken a sauce or for baking.  I don't know who figured out that this works, but I'm very grateful.


A few hours later (maybe 3?) I returned.  I put my baking stone on the top rack in the oven, and my old metal jelly roll pan on the bottom rack, and heated things up to 450. This is how they do it on Artisan Bread in Five.  You put the bread on the hot stone, and pour some cold (or at least room temp) water in the metal pan.  Steam happens. Shut the door to keep it in.  Bake, about 30 minutes or so.  It will smell amazing. Take it out of the oven and leave it alone. Do NOT cut it yet. Wait. At least 20 minutes. Longer if you can. Cutting hot bread is bad. It ruins the texture.

Here is the result.  I cut a few slashes in the top of the bread before baking. It's not necessary, but something they suggest at Artisan Bread in Five.  Look at that gorgeous crust.  


And here it is, cut open - filled with luscious cranberries and crunchy almonds. The texture of the bread itself is light and airy. Delicious.


I couldn't resist, and put a little butter on this slice. Not necessary, but hey, I like butter.